GTA 5 is already an exciting game with its captivating storyline, but what if we told you there’s a way to take it to a whole new level?
By installing these mods, you can dive into a world of new experiences, features, and endless possibilities within the game.
In this post, we’ll show you how to install every mod in GTA 5.
Table of Contents
Prerequisite Tools For Modding
First and foremost, it’s worth noting that GTA 5 doesn’t have a Steam Workshop (although you can play it via Steam), so you can’t install mods by clicking “Subscribe” like the other games.
Therefore, you must install some tools in advance to allow the mods to work on the vanilla version.
Not all mods require all these tools. However, you should follow and install them to cover all the issues that might happen before or during installation.
1. Script hook V
Scrip Hook V is a library that enables the utilization of script-native functions within custom *.asi plugins. In other words, you need Script Hook V to read and run *.asi files.
Installing Script Hook V is pretty simple, but the only downside of this tool is that it becomes incompatible whenever GTA 5 has an update.
In that case, make sure to check out this topic on GTAForums to stay updated.
2. Script hook V .net
Script Hook V .NET is a tool that allows you to run any scripts that are written in the .NET language.
Click the download button below to download Script Hook V .NET, then extract and copy all the files to your GTA 5 root folder.
3. Menyoo Mod (PC)
Menyoo Mod is one of the best mods for GTA 5 ever.
It configures almost all aspects of your GTA 5, including vehicles, structures, character abilities, weapons, and weather.
Overall, if you can install only one trainer, it must be the Menyoo mod.
4. OpenIV
OpenIV is a toolkit that allows you to install mod packages (OIV files), view *.rpf files, and gain access to folders in GTA 5, allowing complete configuration.
5. Game Config
Game Config is required to install vehicle add-ons.
Originally, GTA 5 only accepted and kept all vehicles in the vanilla version or built by Rockstar Games, so all vehicle add-ons were uninstallable. But this mod has you covered!
6. Heap Limit Adjuster
The Heap Limit Adjuster increases the memory allocation for the game’s heap.
This tool is required to fix the “Out of Memory” error when you install add-ons or replace files.
7. Packfile Limit Adjuster
Similar to Heap Limit Adjuster, Packfile Limit Adjuster is required to solve the “ERR_FIL_PACK_1” error, which happens regularly when you install add-ons.
8. Add-On Vehicle Spawner (Optional)
The Add-On Vehicle Spawner is a tool designed for spawning add-on vehicles. This mod displays a list of all installed add-on vehicles, allowing you to select the one you want.
If you’re already familiar with the Menyoo mod, you can skip this option.
9. Modding DLC Pack V
Modding DLC Pack V is an additional DLC file for GTA 5 that enables convenient character, weapon, and vehicle replacement.
By installing the Modding DLC Pack V, you can avoid duplicating the default GTA 5 DLC files, which would otherwise consume additional storage space and lead to longer loading times.
Note: Modding DLC Pack V is an *.OIV file. You must install it in the “mods” folder using OpenIV.
10. AddonPeds
AddonPeds is required to add new characters to your game without replacing any files.
11. Map Builder
Map Builder is a required tool to install or customize map mods in GTA 5.
12. Object Spawn Unlocker
Object Spawn Unlocker allows you to create, customize, or keep all objects in GTA 5. This tool is also required when installing a map mod.
13. Map Editor & Menyoo to YMap Converter
Map Editor & Menyoo to YMap Converter is a required tool to install the YMAP mod.
How to Install Car Mods in GTA 5
In GTA 5, there are countless car mods available, and most GTA 5 car mods focus on adding new cars, replacing cars, changing livery, and customization.
The GTA community has created lots of car mods, and you can explore them here or here.
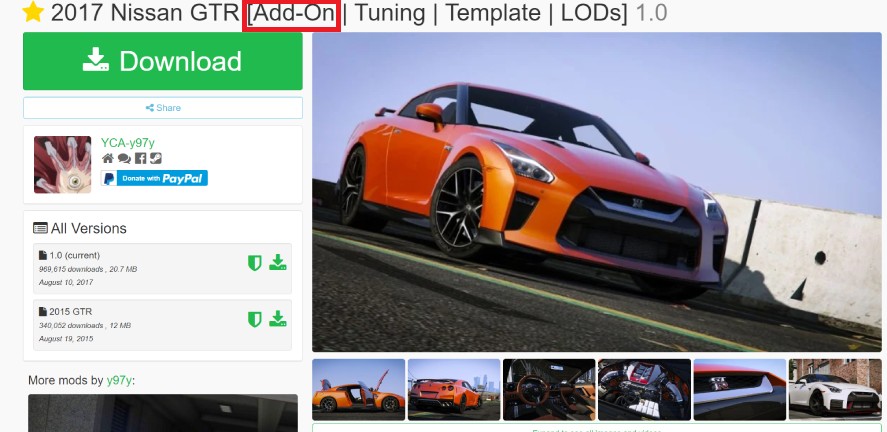
Keep in mind that before downloading a vehicle mod, you should check its name or its instruction guide to determine its type (add-on, replacement, or both).
Now, let’s find out how to install each of them!
1. How to Add Add-On Cars
Vehicle add-ons introduce entirely new cars or vehicles into the GTA 5 world, each with a unique name. In simple terms, add-ons increase the total number of cars available.
To install car add-ons, follow and install Game Config first.
Next, select any vehicle add-on you love, as long as it has “Add-On” in its name.
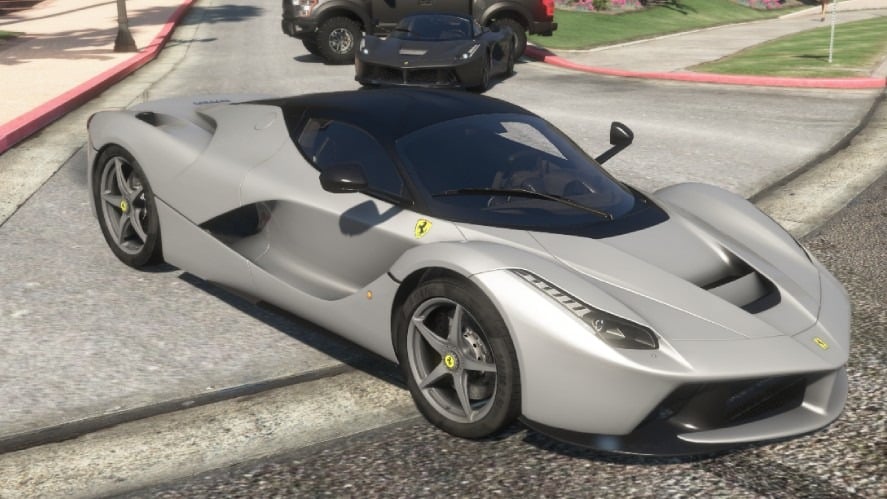
In our case, we’ll select a 2015 Ferrari LaFerrari, as shown in the image below:

Download and extract the file, then open OpenIV.
If this is your first time using OpenIV, select GTA 5, then select the path that leads to the GTA 5 root folder.
At the top of the OpenIV window, click on “Edit Mode” to enable editing, then drag and drop the extracted file to “mods/update/x64/dlcpacks“.
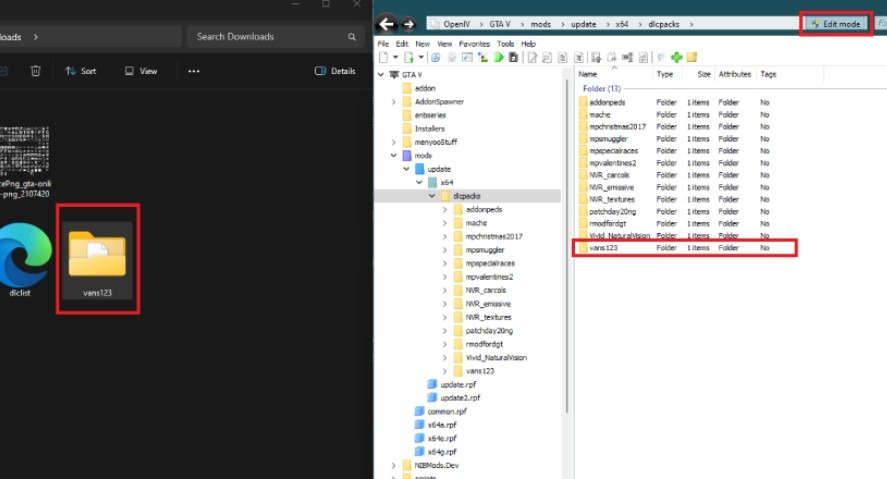
After that, locate “dlclist.xml“, which is at “mods/update/update.rpf/common/data”, then select “Edit”.
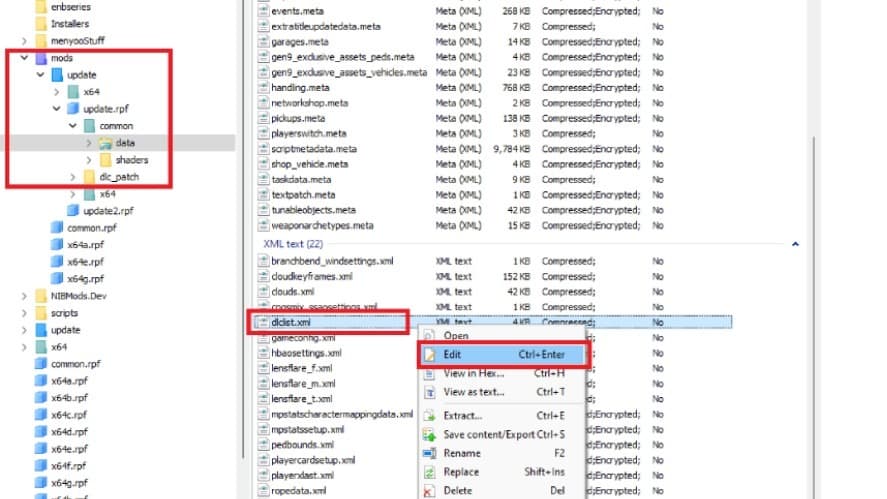
In the text editor window, scroll down to the bottom of the list, then type in <Item> dlcpacks:/vans123/</Item>.
You have to replace the name of your vehicle after dlcpacks. In our case, it’s vans123.
Click Save, then close OpenIV. Open your GTA 5, then press “F5” to enable the spawn menu (if you install Add-On Vehicle Spawner), or press “F8” => “Vehicle Options” => “Vehicles Spawners” => “Input model”, then type in the name of the ad-on.
Press “Enter” and get your reward!
Just a tip: Some vehicle add-ons are *.OIV files. In that case, it’s pretty easy to install directly via OpenIV.
2. How to Replace Car
Replacement mods are designed to replace the existing vehicles in GTA 5 with new ones. When you install a replacement mod, it doesn’t add an extra vehicle. Instead, it swaps out a specific in-game car for the one provided by the mod.
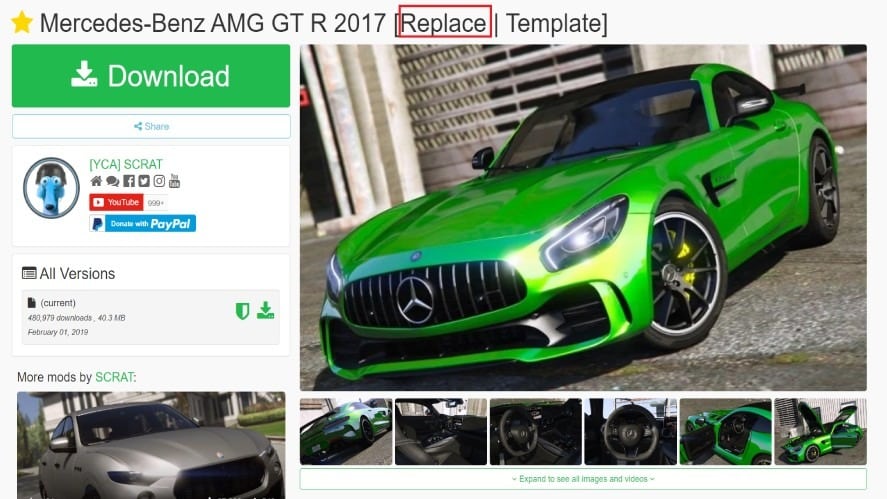
Make sure you have already installed the Modding DLC Pack V in advance, then head to the mod websites and select the replacement car you want, as long as it’s labeled “Replace” in its name or its instructions.
In this case, our choice is the Mercedes-Benz AMG GT R 2017.
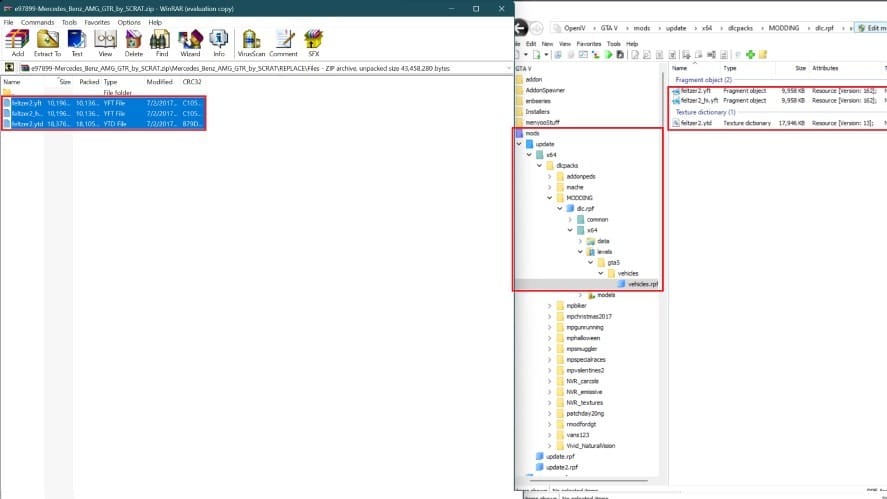
Before downloading the replacement mod, it’s advisable to look up the instructions to find out which in-game vehicle is being replaced. In our case, the Feltzer is replaced by the Mercedes-Benz.
Open OpenIV, then enable “Edit mode”, then go to this path: “modsupdatex64dlcpacksMODDINGdlc.rpfx64levelsgta5vehiclesvehicles.rpf“.
Open the downloaded file, go to the “Replace” folder, and drag and drop all the files to the above path.
Open GTA 5, spawn the car that is replaced, and check the difference!
Depending on each mod, there are other additional files you must install to make the most of it (additional meta, handling, sound, etc.). These files are instructed in the Readme file, so you’d better read them in advance.
Keep in mind that you shouldn’t replace the default cars of the protagonists, which may result in errors and crashes during some missions.
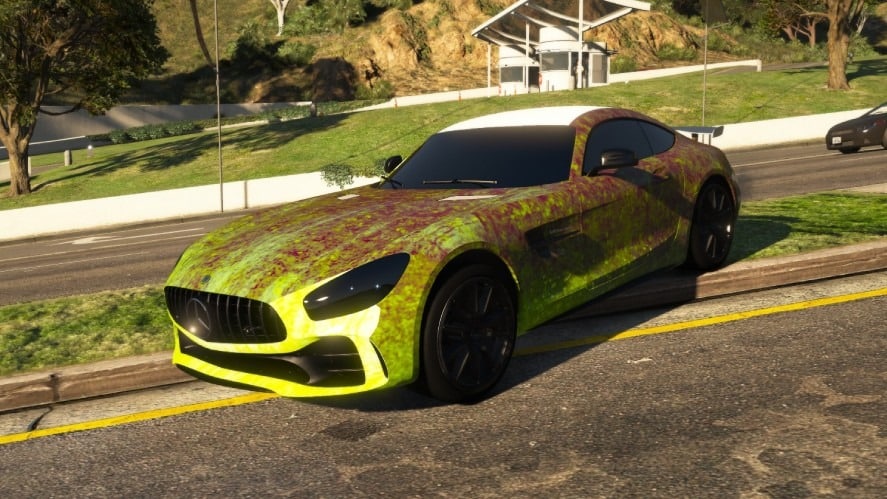
3. How to Change Livery
As its name implies, this mod aims to change a specific car’s liver. Therefore, before applying the livery, you must install the add-on or replaced car mod.
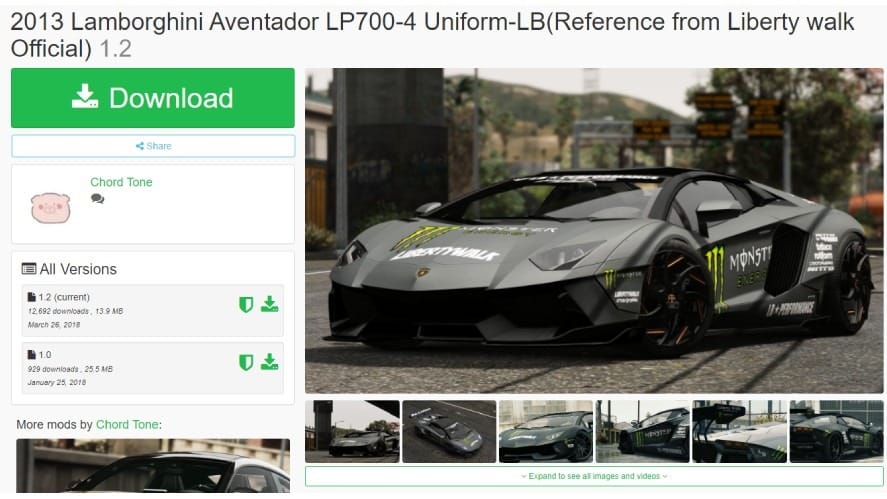
As usual, head to the mod website, then choose the livery you like. For example, our livery selection is the 2013 Lamborghini Aventador LP700-4 Uniform-LB.
Since this car wasn’t installed in our game, we need to install it first and make sure we can spawn it without any errors.
First, open OpenIV, then enable Edit Mode. Use OpenIV to locate the folder where you’ll install the new livery. In our case, it’ll be: “Grand Theft Auto Vmodsupdatex64dlcpackslp700rdlc.rpfx64vehicles.rpf“
Keep in mind that each add-on has a different name (in our case, its name is lp700r), so check the name of the car you’re going to install the livery carefully.
Next, extract the livery file. You may have 2 types of livery files: PNG and YTD. Here’s how to install each of them:
- For the *.ytd file, simply drag and drop it to the file path above.
- For the *png file, you need to open *.ytd in the file path first, then drag and drop all the png in.
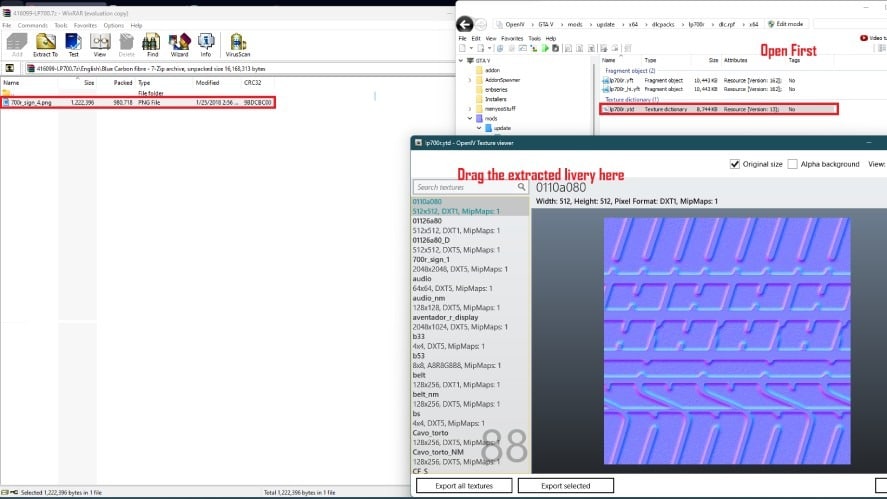
Click Save to complete the step, then close OpenIV and start GTA 5.
Use the Menyoo mod to spawn the car, then select “Vehicle Options” => “Menyoo Customs” => “Livery” and change.
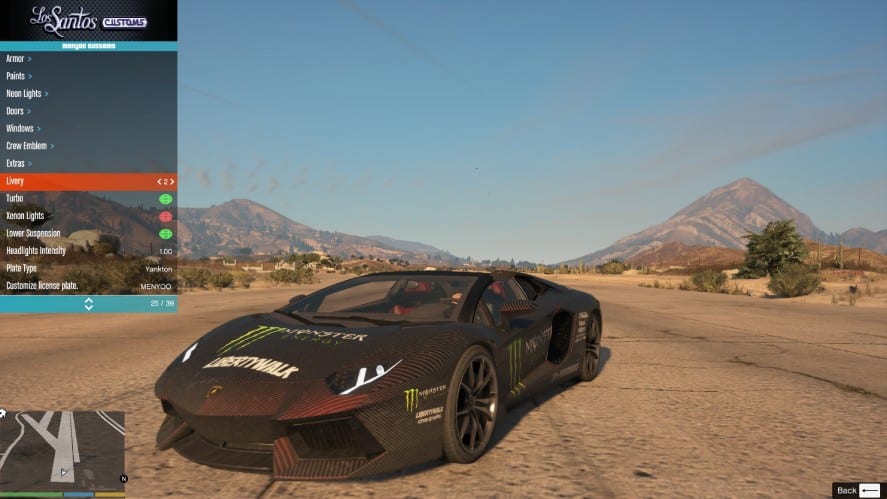
Enjoy!
4. How to Change Vehicle Sound
Changing vehicle sounds simply replaces the default sound of cars in GTA 5 with others (both default cars and add-ons), making driving more exciting.
First, you need to download a vehicle sound file from a GTA 5 mod website. You can choose any sound file you want, but it’s essential to read the instructions first to check which car this mod will replace the sound for.
In that case, we pick the Vehicle sound pack mod.
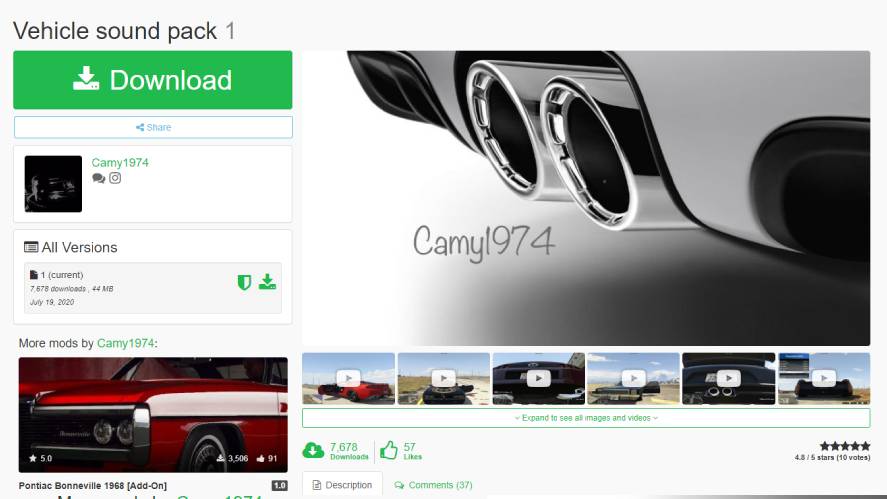
Following the instructions, none of the supported vehicles are initially installed in our game, so we need to select one to install first.
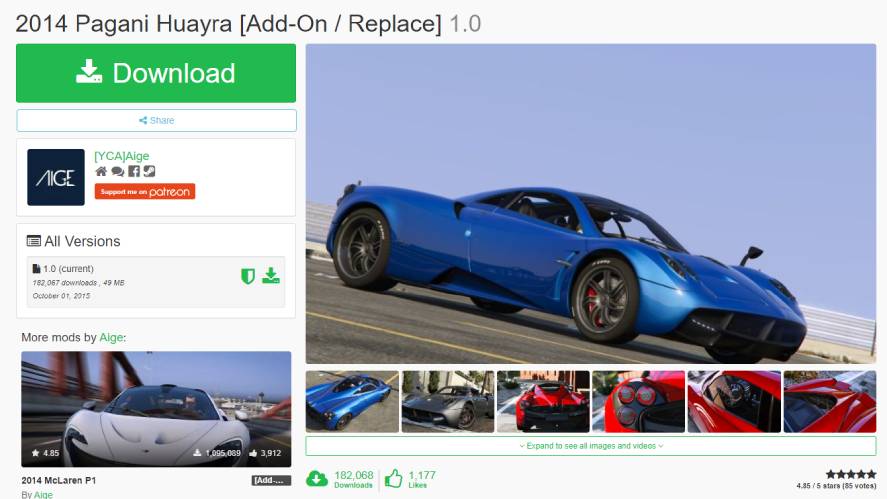
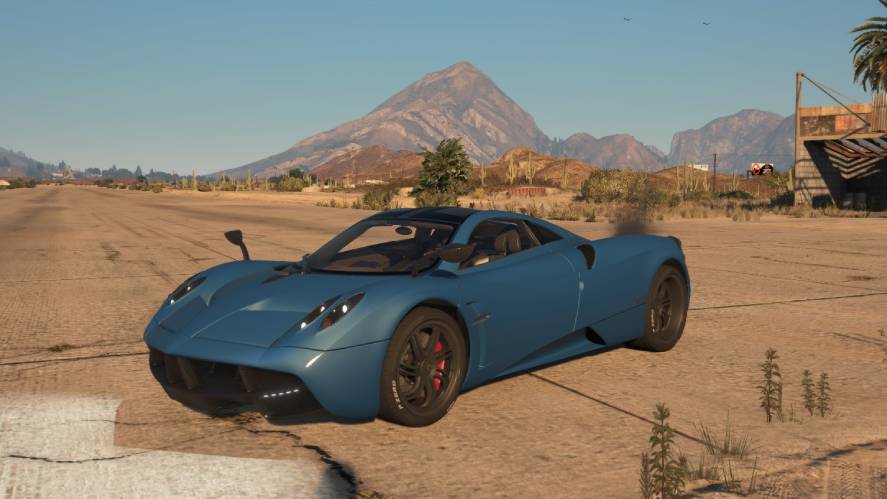
Our choice is the 2014 Pagani Huayra.
Download this vehicle add-on and install it following our #1 guide, then spawn the car in the game to ensure no errors occur.
Extract the Vehicle sound pack and locate the Pagani Huayra folder. You’ll notice the sound file is the *.awc file.
All you need to do is drop this *.awc into the replacement path of your GTA 5 game, but finding this path is more difficult than you might think.
To locate where you must drop the file, copy the name of the *.awc file (in this case, vagner.awc), then paste it on the search tool of OpenIV, which can be opened using the combination “Ctrl + F3”.
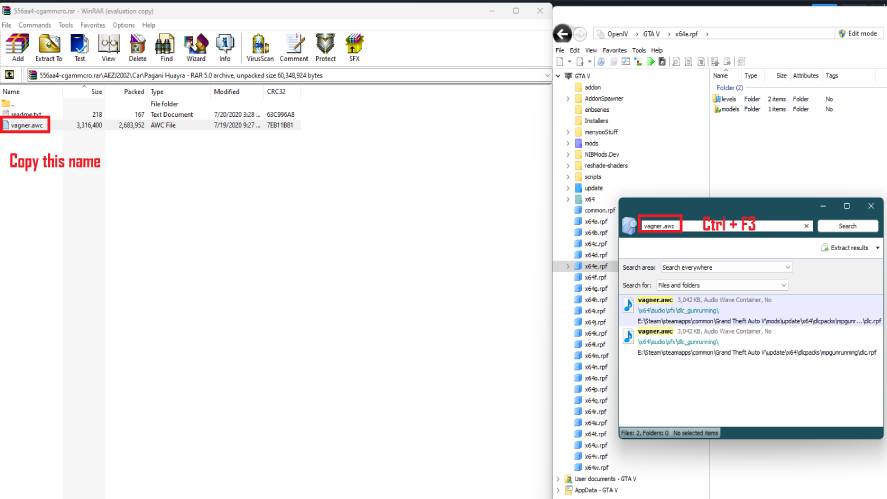
Click on the first result in the search tool to view the sound folder, then drop the vagner.awc to that folder.
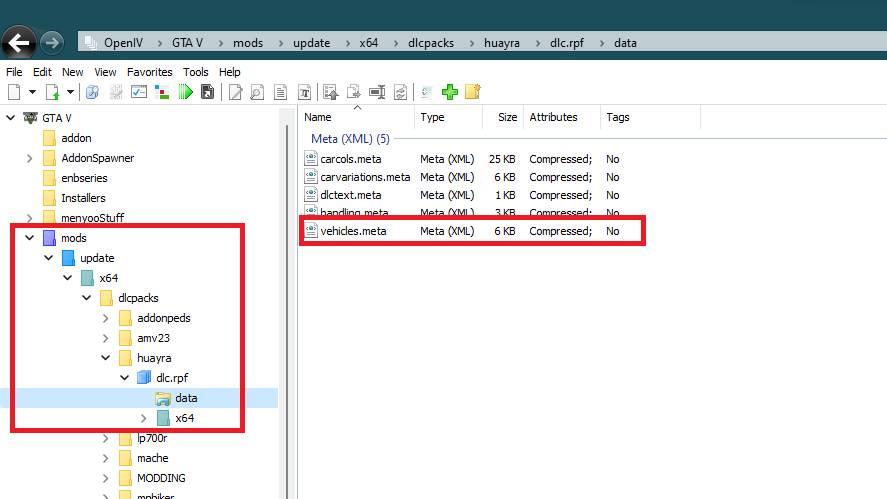
Go back to your 2014 Pagani Huayra folder and locate the vehicles.meta file, whose directory is “Grand Theft Auto Vmodsupdatex64dlcpackshuayradlc.rpfdata”.
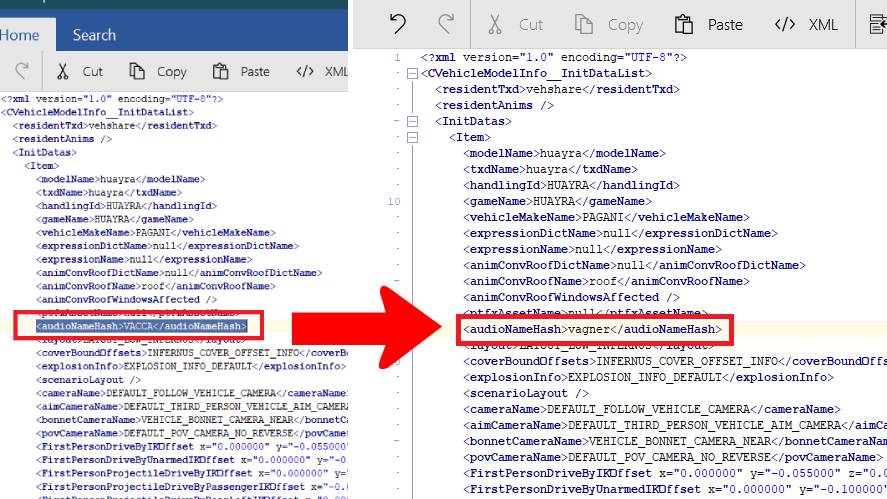
Right-click on vehicles.meta and select “Edit”, then find the <audioNameHash> column. Replace the Vacca in that column by vagner.
Click “Save”, then open GTA 5, spawn the 2014 Pagani Huayra, and enjoy the new sound!
5. How to Modify Handling
In GTA 5, handling refers to how a vehicle performs and responds to player input, including speed, acceleration, steering, and overall driving characteristics.
The handling mod in GTA 5 enhances the driving experience, making it more realistic and enjoyable.
To supercharge your car’s handling with a handling mod, ensure you’ve already installed a compatible vehicle for this mod.
The best website to install handling mods is gta5-mods.com. So check out this site and choose which one you love the most.
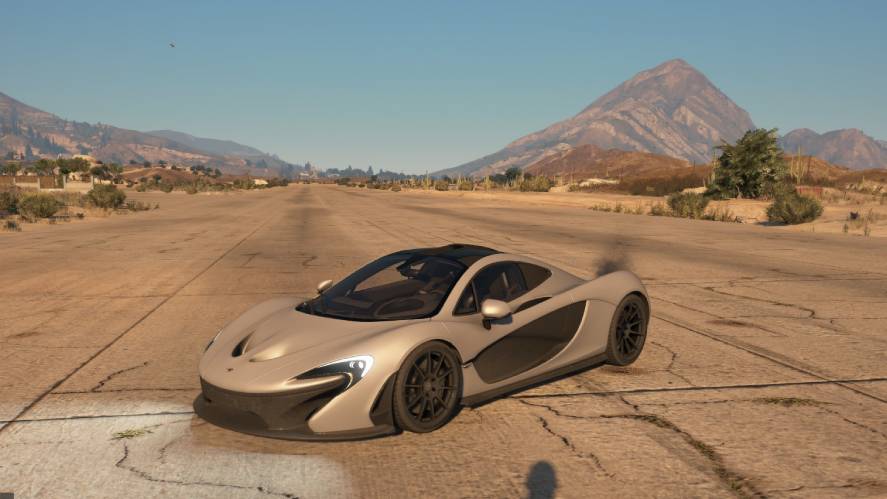
Our example here is to improve the handling of the 2014 McLaren P1. Since we haven’t had it in our game, we must install the 2014 McLaren P1 first.
After installing the vehicle add-on, you can drive for a while to test its initial handling, making it easier to spot the difference subsequently.
Next, download and extract the handling mod, then copy and paste the handling.meta file to the add-on folder: “Grand Theft Auto Vmodsupdatex64dlcpacksp1dlc.rpfdata“.
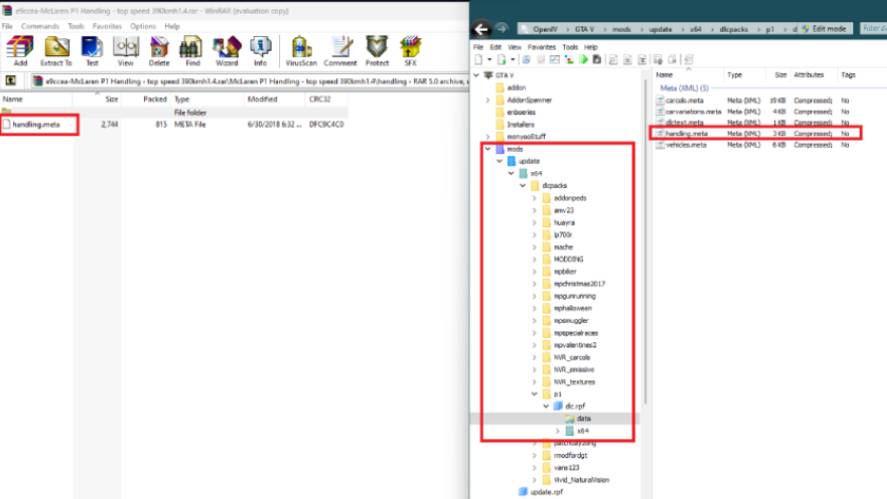
Close OpenIV, then launch GTA 5. Buckle up and do your best to handle the speed demon.
How to Install Character Mods in GTA 5
Similar to installing car mods, installing character mods consists of add-on characters and replacement characters.
The purpose of installing character mods is not only to change the character’s appearance but also to add new features or give them new powers.
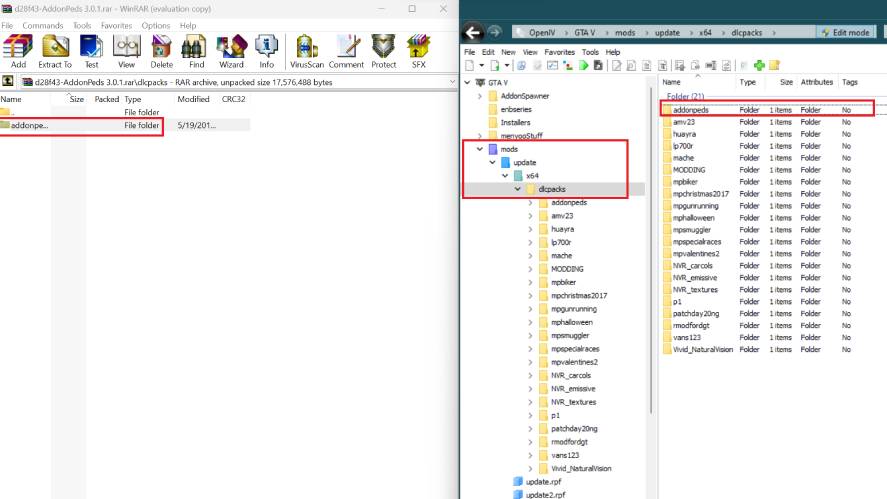
To add or replace any characters, AddonPeds is required. Make sure you install AddonPeds without errors before jumping into the next steps.
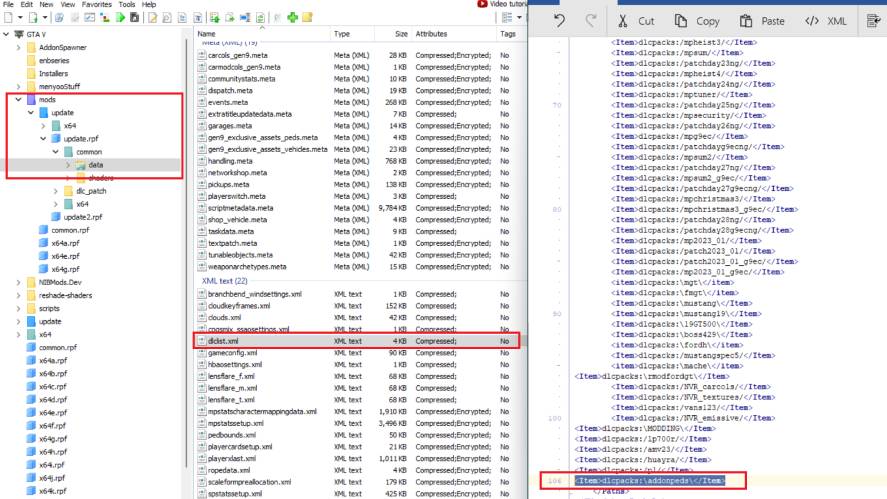
First, download AddonPeds from the button above, then paste the “addonpeds” folder to this path using OpenIV: “Grand Theft Auto Vmodsupdatex64dlcpacks“.
Next, go to “Grand Theft Auto Vmodsupdateupdate.rpfcommondata”, right-click on dlclists.xml and select “Edit”, then type in <Item>dlcpacks: addonpeds </Item> at the bottom of the file and click Save.
Copy and paste the rest of the addonpeds folder to your GTA 5 folder.
1. How to Add Add-On Characters
An add-on character mod is a mod that adds a new character with not only appearance but also special abilities. Add-on characters only apply to your protagonists.
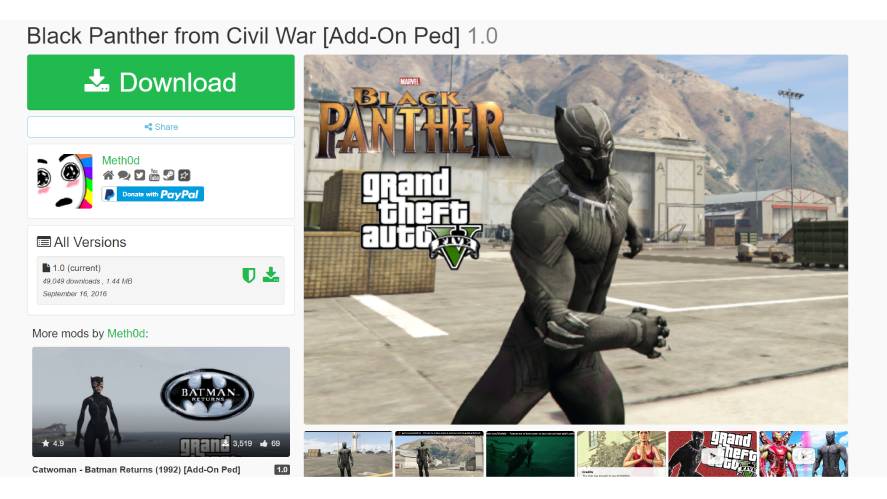
First, find and download your favorite character. Our choice is the Black Panther from Civil War in the Marvel Universe.
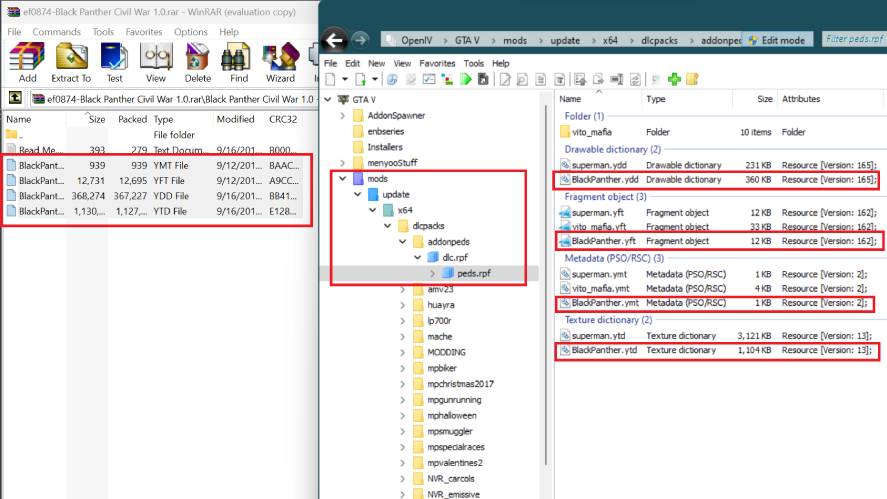
Each add-on folder contains 4 important files: YMT, YFT, YDD, YTD. These files will be copied to the addonpeds folder in dlcpacks, whose path is “modsupdatex64dlcpacksaddonpedsdlc.rpfpeds.rpf”.
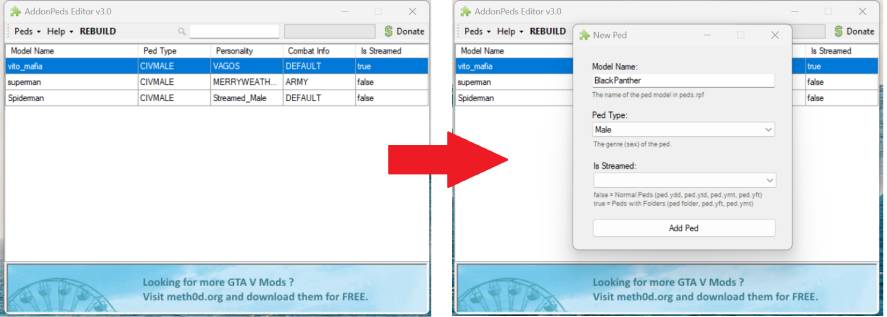
Open AddonPeds Editor v3.0 with your administrator permission, then select “Peds” => “New Ped”, and type in the exact Model Name (for example, BlackPanther), Ped Type (Male or Female) and Is Streamed (False), and click on “Add Ped”.
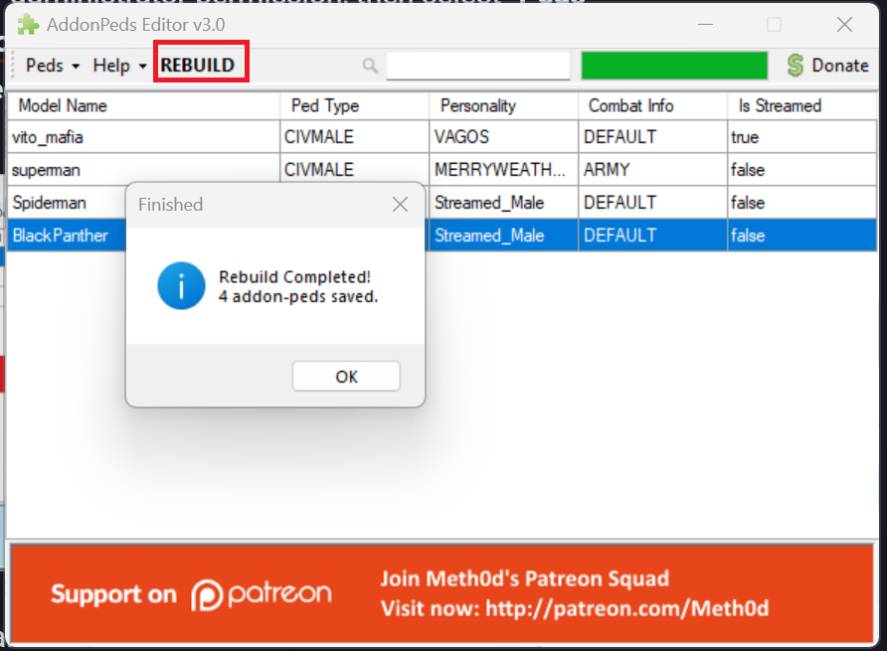
Click on the recent BlackPanther ped and select Rebuild.
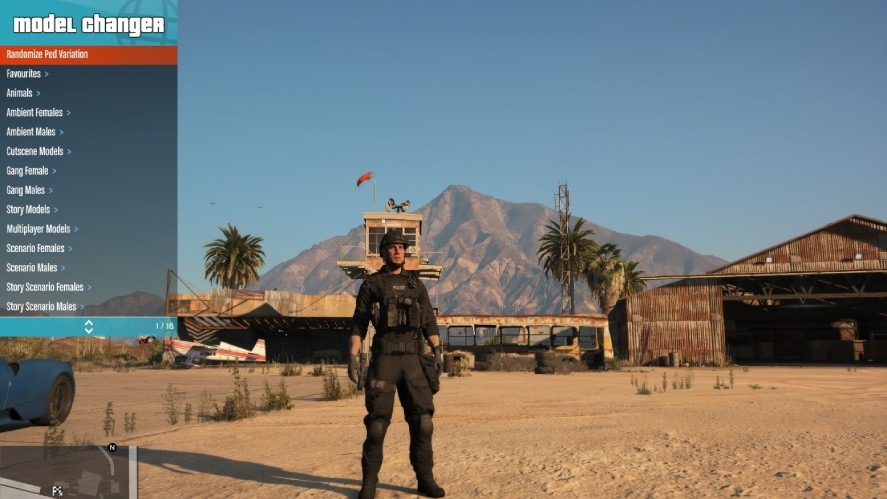
Open GTA 5, then press “F8” to enable the Menyoo menu, select “Player Options” => “Model Changer” => “Input Model” then type in “BlackPanther”.
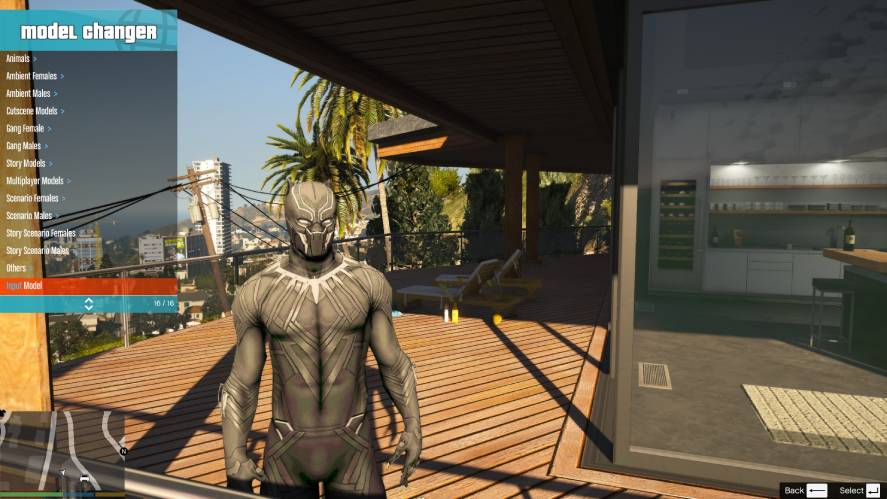
Press “Enter” and enjoy the new skin.
2. How to Replace Peds
The goal of replacing peds in GTA 5 is similar to replacing vehicles. In other words, it’s about changing the appearance of the existing peds rather than adding a new one.
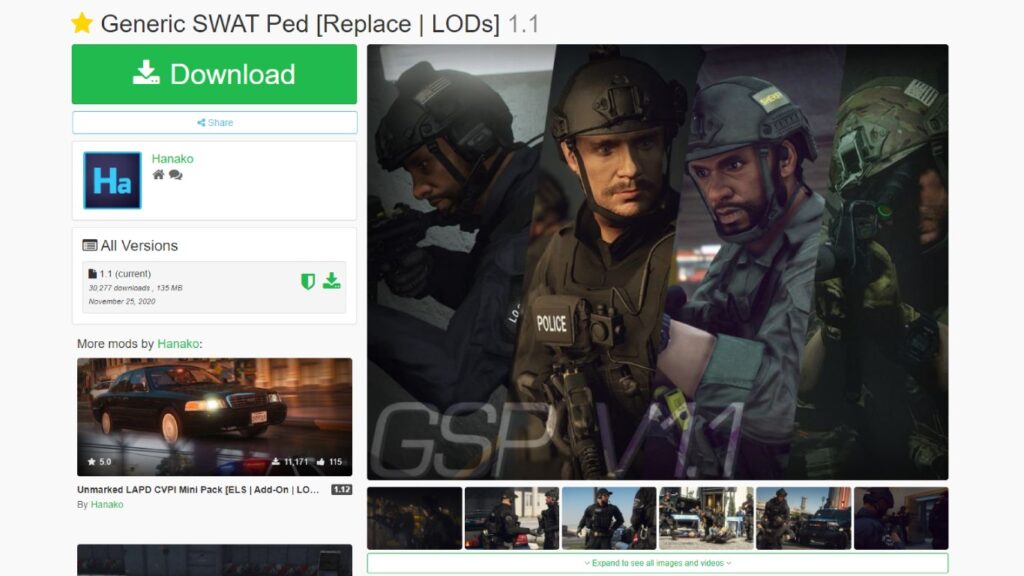
As usual, go to any mod website and choose the replacement you like. Our pick is the Generic SWAT Ped.
The difficult part of replacing the peds in most cases is determining which default peds are going to be replaced.
Therefore, along with reading the instructions, you should check out this site to learn more about all the characters in GTA 5.
This Generic SWAT Ped replaces the vanilla SWAT in GTA 5.
First, download the mod and extract, then open OpenIV and enable Edit Mode.
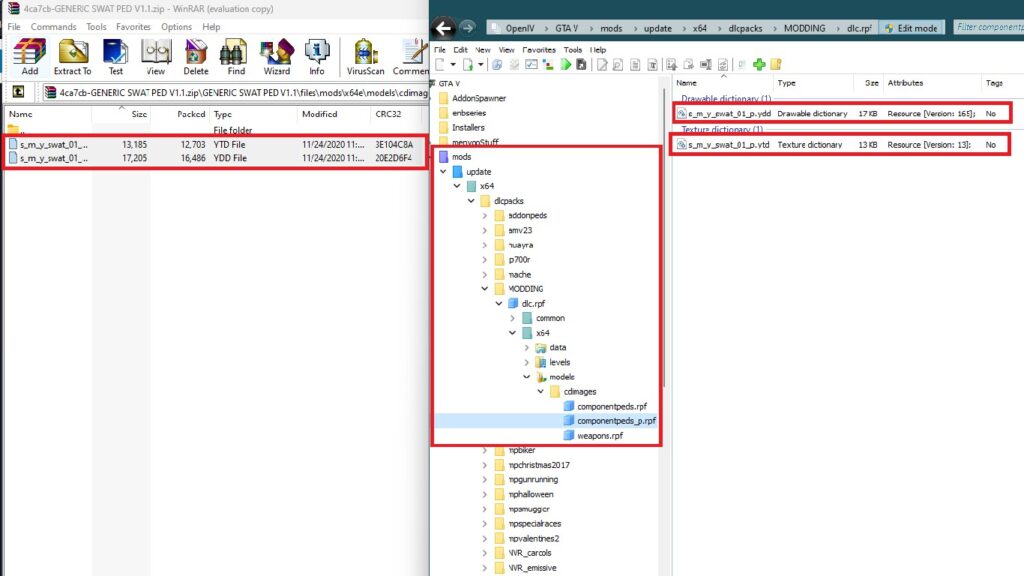
In OpenIV, go to: “modsupdatex64dlcpacksMODDINGdlc.rpfx64modelscdimages“, then copy all the files in componentpeds_s_m_y.rpf (in the Generic SWAT Ped folder) to componentpeds.rpf in OpenIV.
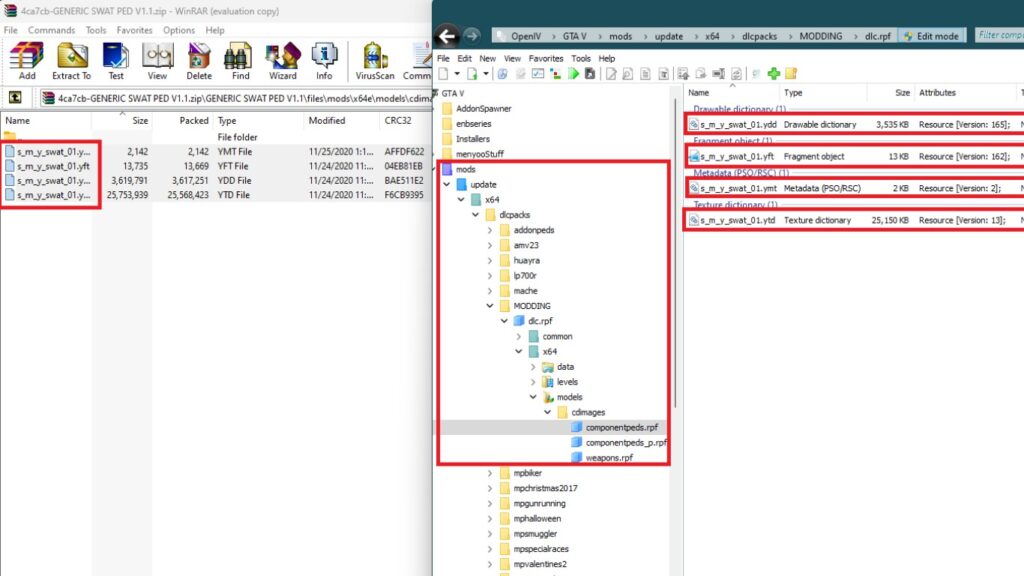
Next, copy all files in pedprops.rpf (in the Generic SWAT Ped folder) to componentpeds_p.rpf in OpenIV.
Open GTA 5, and use Menyoo mod to spawn the ped. At the Input box, type in the name of the ped: s_m_y_swat_01, then press “Enter”.
Enjoy!
How to Install Weapon Mods in GTA 5
Weapon mods in GTA 5 contain replacement mods (primarily guns) and gun sound mods.
By installing weapon mods, you’ll have more choices of new guns as well as new cool sounds, making your game more fun.
1. How to Replace weapons
Replace weapons in GTA 5 is basically similar to replacing Peds. Make sure you have already installed Modding DLC Pack V. If not, stop here and go for it first.
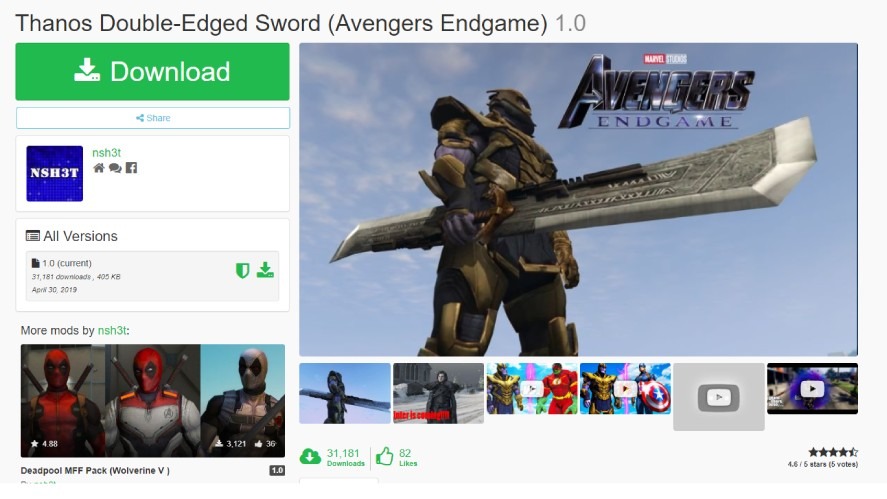
First, select a weapon mod you want to replace, then download it.
Our choice is the Double-edged Sword of Thanos in the Avengers movie.
Extract the file. There are 2 files in any replacement weapon folder (*.YDR and *YTD).
Use OpenIV and navigate to this path: “modsupdatex64dlcpacksMODDINGdlc.rpfx64modelscdimagesweapons.rpf/“, and drag all files from the mod folder to this folder.
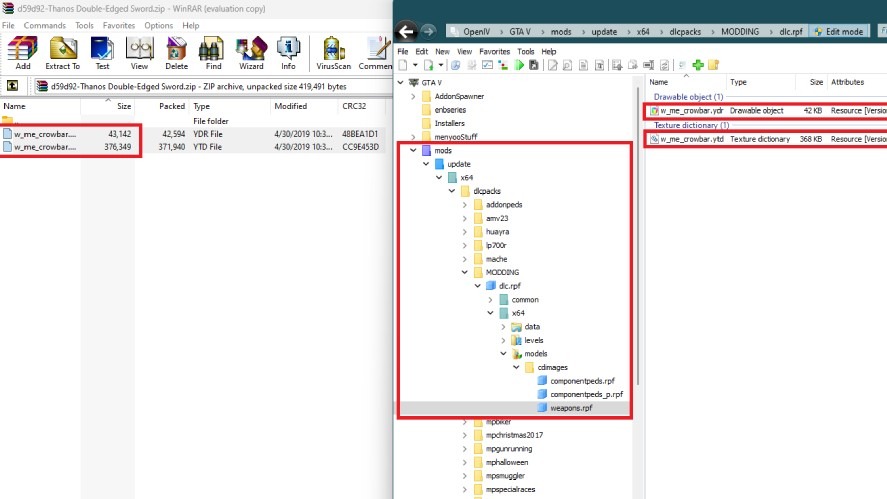
Next, recheck the mod’s name to find out which default weapon is replaced (in this case, the crowbar).
Open GTA 5, then press “Tab” to select your weapon, change the wheel to melee, and navigate until you find the Crowbar.
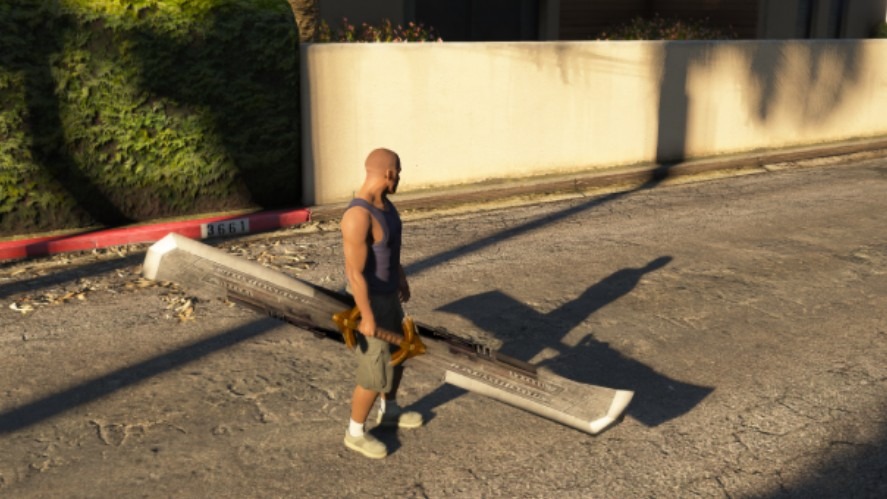
Enjoy!
2. How to Change Gun Sound
Changing the gun sounds in GTA 5 can be a bit complicated. Depending on the mod types, the gun sounds come in *.OIV, *.awc, *.oac, or *.wav formats.
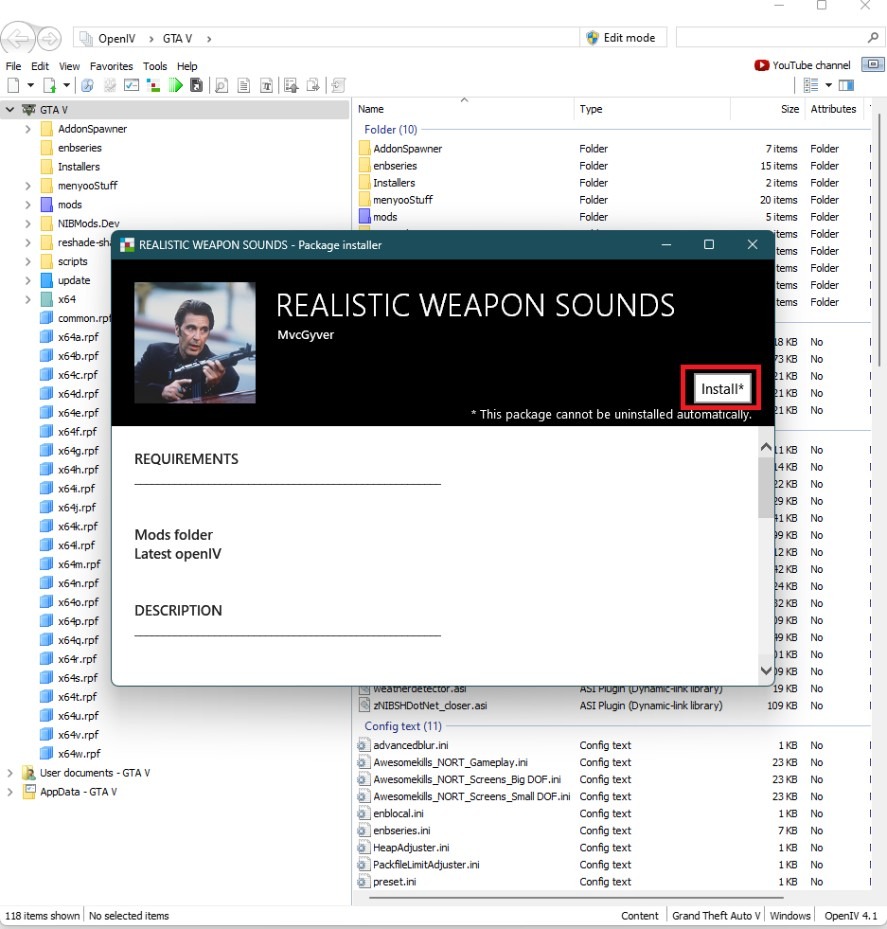
Installing *.OIV is the easiest method, as you can simply use OpenIV’s “Package Installer” feature.
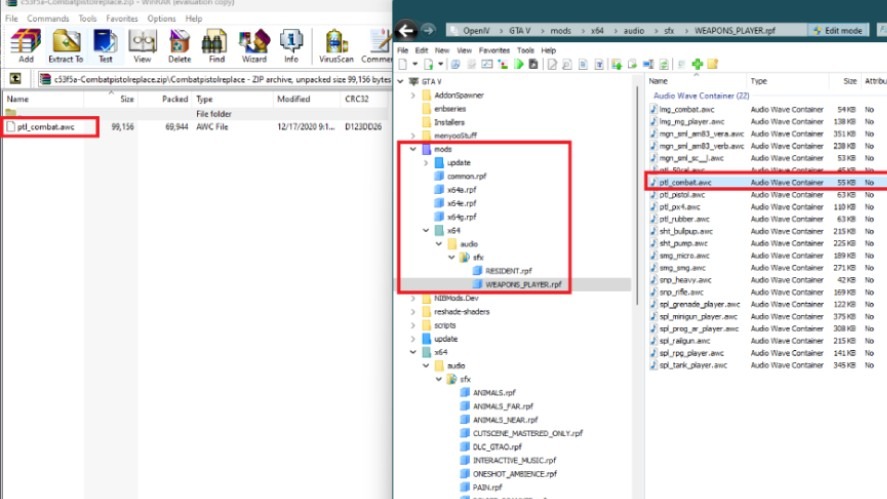
For the *.awc file (for example, the Glock Sound mod), extract and then place the file in either path: “modsx64audiosfxRESIDENT.rpf or modsx64audiosfxWEAPONS_PLAYER.rpf”
Open GTA 5, spawn the exact gun, and check the difference!
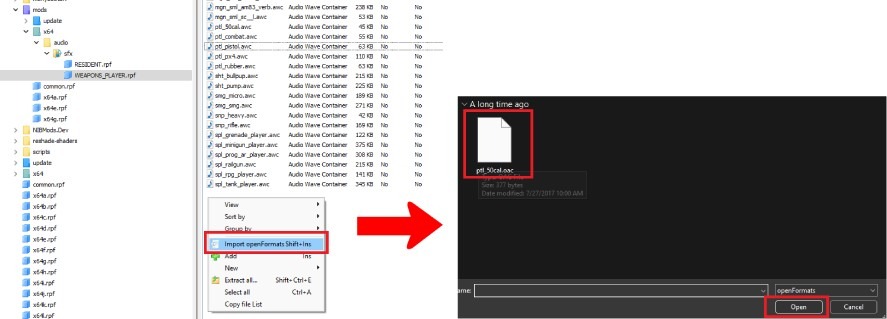
You can apply the same method to install the *.oac file. However, one more step is added:
Open OpenIV, then go to either path: “modsx64audiosfxRESIDENT.rpf” or “modsx64audiosfxWEAPONS_PLAYER.rpf”, right-click on the blank area, and select “Import openFormats”.
In the next window, locate and select the *.oac file, then click open and click OK.
Open GTA 5, spawn the corresponding gun, and enjoy!
How to Install Graphics Mods in GTA 5
There are many choices when it comes to elevating the textures and graphics of GTA 5.
However, it’s important to note that many of these mods offer presets that can sometimes lead to a drop in FPS, so having a computer with solid specs is advisable.
Our pick for the ultimate graphics mod to install in GTA 5 is NaturalVision Remastered. This mod delivers comprehensive enhancements to virtually every aspect of the game, making it a top choice for an all-around improvement.
Check out this post to learn how to download and install NaturalVision Remastered.
How to Install Map Mods GTA 5
Map mods in GTA 5 contain packs of maps from GTA Online, new structures or constructions created by authors, or simply a map that allows you to access the pre-built ones in the vanilla map.
Before installing a map mod, make sure you have already installed Map Builder and Object Spawn Unlocker.
1. How to Install MLO Map Mods
Installing a map mod (MLO) is basically similar to installing an add-on vehicle, meaning that you need OpenIV to complete the steps.
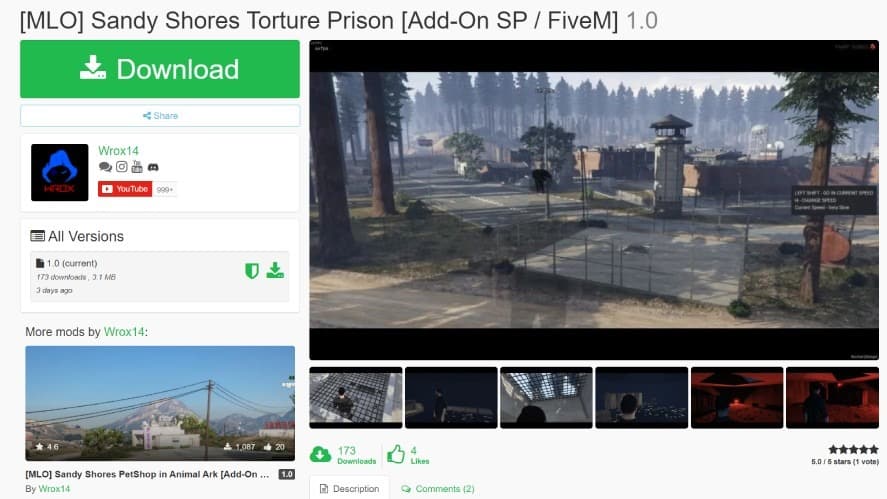
First, select and download the MLO map you wish for. Our choice is the Sandy Shores Torture Prison.
Extract the file, then copy the wrx_prison folder to “modsupdatex64dlcpacks“.
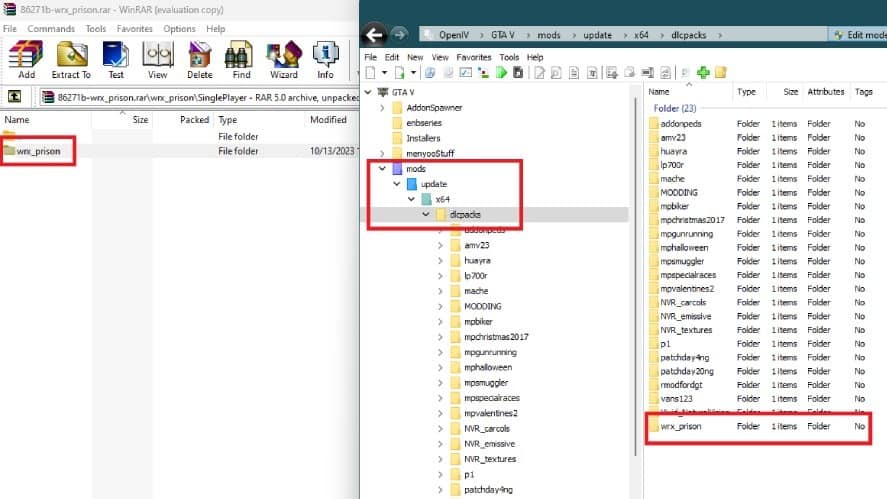
Next, Open dlclists.xml in “modsupdateupdate.rpfcommondata” and add this line at the bottom: /<item>/dlcpacks:wrx_prison<item>/, click “Save” and close OpenIV.
Open GTA 5 and enjoy!
2. How to Install YMAPs
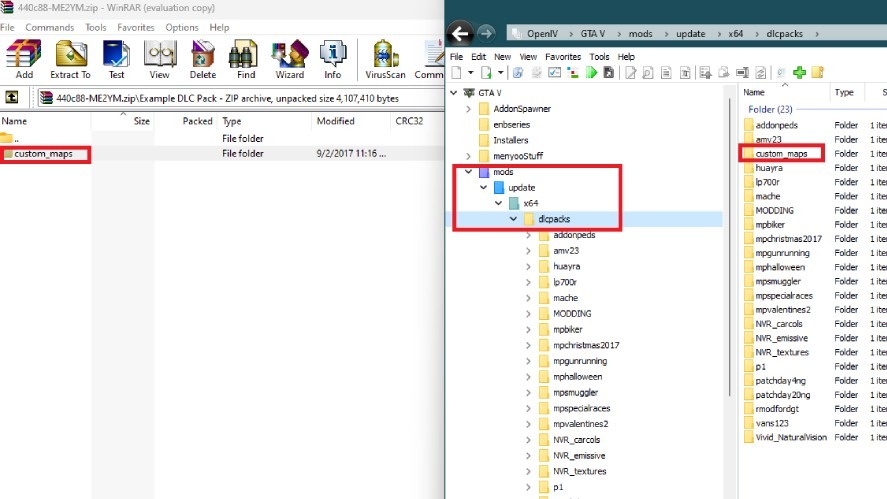
Before installing YMAP, ensure you have installed the Map Editor & Menyoo to YMAP Converter.
First, download Map Editor & Menyoo to YMAP Converter using the button above, then open OpenIV and copy the custom_map folder to this path: “modsupdatex64dlcpacks“.
Next, find and download a YMAP mod you’d love to install. Our choice is the Mafia Map.
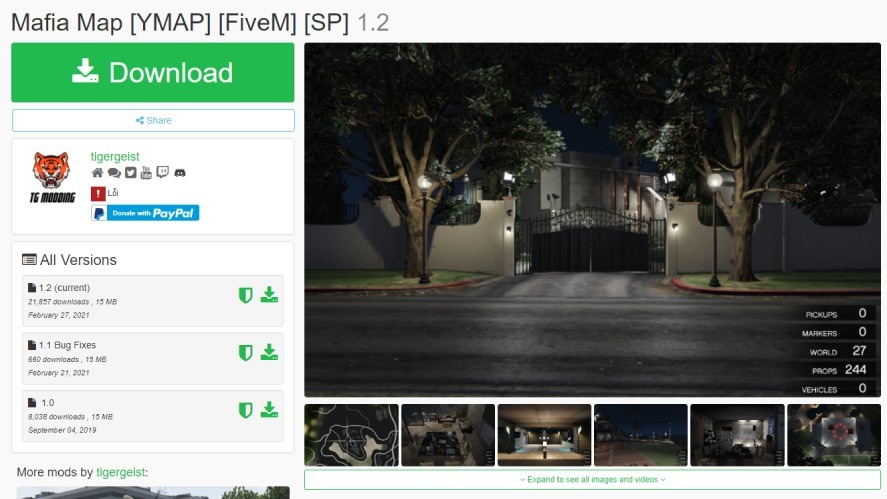
Extract the custom_map folder in the Mafia map, then put it in this path using OpenIV: “modsupdatex64dlcpacks“.

Open GTA 5, go to the place where the map is applied, and feel free to explore!
3. How to Unlock all GTA Online Maps in your GTA 5 Story Mode
GTA Online not only allows you to play with your friends and earn valuable rewards but also offers new maps, which are unavailable in GTA Story mode.
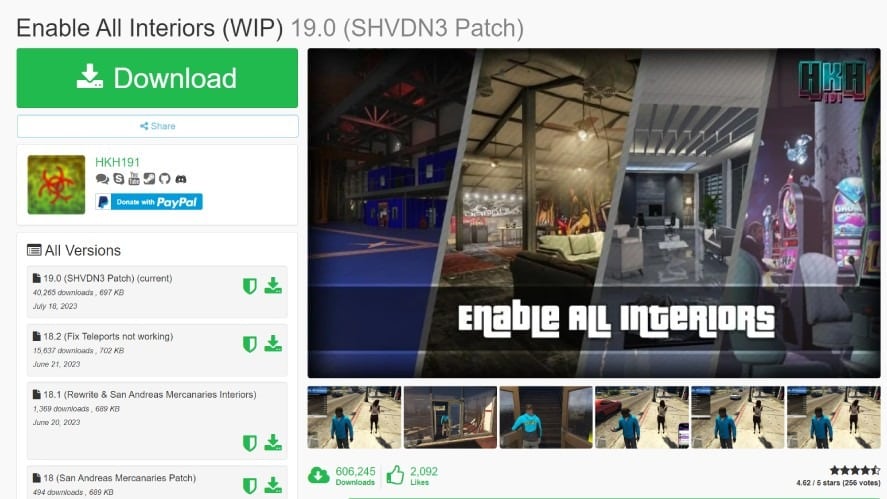
However, if, for personal reasons, you prefer to explore these maps in Single mode rather than multiplayer mode, then the Enable All Interiors mod is the one you should look for.
First, click on this link to download the Enable All Interiors mod.
Next, download LemonUI, then paste all the files to the scripts folder in your GTA 5 directory.
Extract the Enable All Interiors folder, then copy and paste all the files in the scripts folder to the scripts folder in your GTA 5 directory.
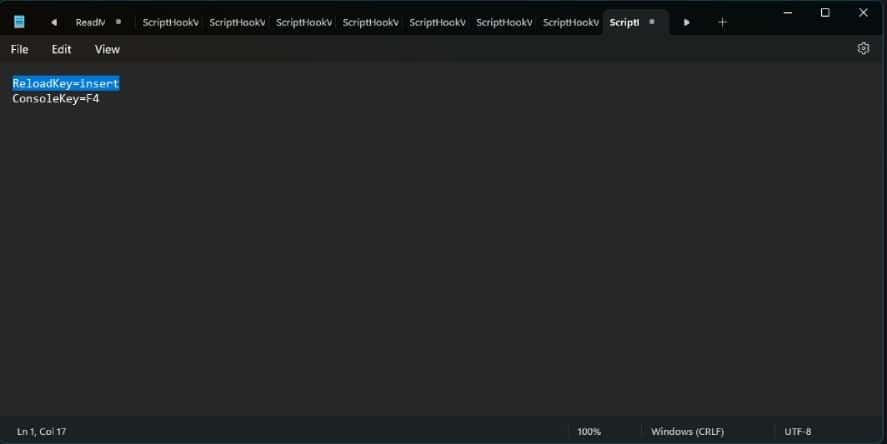
Next, install ScriptHookVDotNet by downloading and placing all files to your GTA 5 directory. Open ScriptHookVDotNet.ini and replace ReloadKey from “None” to “Insert”.
Next, open GTA 5 and press the Up arrow to bring up the phone, then move up to enable the contact name “Enable All Interiors”.

Press the middle button to call this number, and a mod menu appears after that, showing all available online interiors in Story mode.
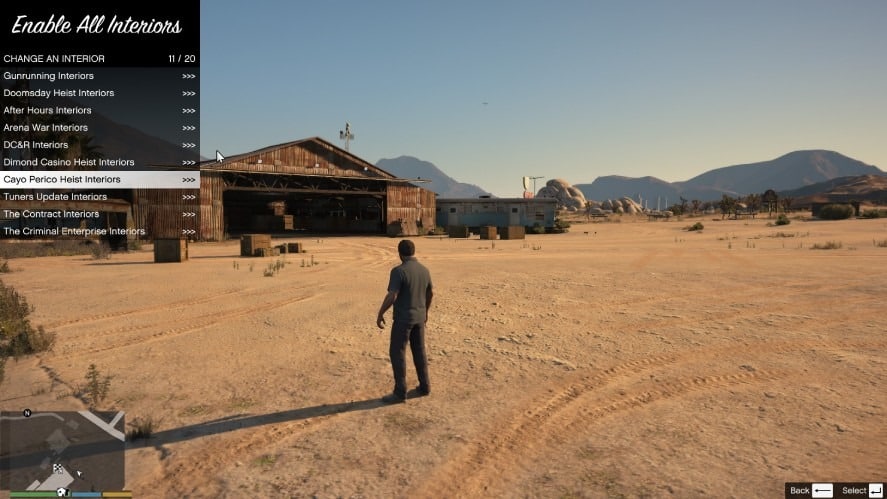
You can decide to enable or disable any structures, constructions, or maps on the mod menu. Moreover, don’t forget to press Insert before going to the spawned map.